 In The Elder Scrolls Online the damage of your abilities is scaled with the resource type required to cast specific spells or attacks. When building your character it’s yet another thing you should keep in mind, and try to use a majority of your spells from skill lines that use the same resource. If you’re putting most of your attribute points into magicka and skill points into weapon skills, you won’t get any extra damage on those abilities. Below is a basic list of skill lines categorized by resources required to cast spells within them.
- Magicka: all Class skill lines/spells, Restoration Staff and Destruction Staff, Mages Guild, Vampirism, Undaunted, Light Armor, Soul Magic, Alliance War: Support.
- Stamina: weapon skills (except staves), Fighters Guild, Warewolves, Medium Armor, Heavy Armor, Alliance War: Assault.
Also worth mentioning is light and heavy weapon attacks also gain bonus damage from your stamina pool.
Building a character around this
If you’re building an archer who’s main attacks will be from Bow skill line, then focus your attribute points into a large stamina pool. It will not only enable you to perform more attacks from the same skill line, but also enable you to dodge or sprint more. Furthermore, the damage on all abilities in the Bow skill tree is scaled by your max stamina, making it an obvious choice for this build.
If you want to build some sort of a battlemage — a Sorcerer smacking faces with a melee weapon then you’ll notice your abilities in weapon skills scale with stamina while your class spells scale with magicka. Placing tons of attribute points into both stamina and magicka (plus some in health as well) may not be the most optimal idea. While ESO does allow you to build a unique and flexible character, there are some builds which are less optimal.
An example of a well-rounded build would be a melee DPS Templar with the Aedric Spear class skill line as the main damage source and Light armor for additional magicka bonuses. It’s a very good leveling build that gains additional damage as you increase your magicka. Sprinkling your class abilities with weapon skills like 1H an Shield or Dual Wield is not uncommon, but the abilities in weapon trees will scale off of your stamina of which you potentially won’t have too much.
It’s also important to consider what kind of armor you’ll be using. Light armor gives you bonuses to magicka, while medium will improve your stamina. Thus the aforementioned Templar would often use light armor, while an archer would go with medium. Different types of armour can give you significant bonuses to resources and it’s essential to use the right armor for your build. Even the relatively insignificant racial passives come into play here as every bit helps.
Overcharging
Note: since patch 1.6 soft caps for stats other than Armor and Magic Resist have been removed!
Weapon or Spell Damage, Heath, Stamina, Magicka, and other stats no longer have any soft or hard caps, so you can dump as many points into them as you like.
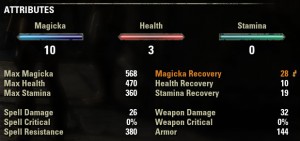
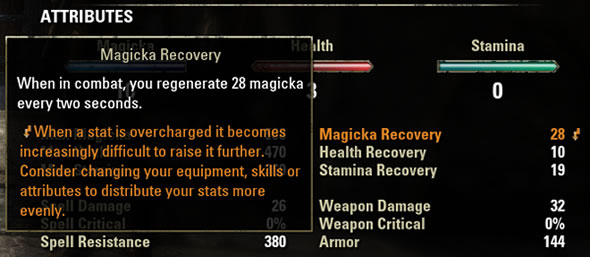
An important thing to keep in mind is that you can’t just dump all of your attributes into one thing without setting off “overcharge”: a system of diminishing returns. Once you hit the overcharge threshold in any of your character stats placing more emphasis in the same will give you extremely low returns. While a mage would naturally want to increase his magicka pool as much as possible, it’s not always the most optimal way to build a character.

You can gain extra magicka and regeneration from armor, enchants, traits, passive skills, racials and even Mundus stones. Consider spending your attributes more evenly between two main stats as a mage: health and magicka. In fact if you plan on using light armor and plenty of magicka enchants or passives, dumping a lot of points into health can be a good idea: for every attribute point in health you gain +20, while magicka and stamina both give +10 each; meaning spending 10 attribute points into health will give you 200, or 100 of stamina or magicka if spent on those stats respectively. Armor traits and enchants on the other hand have an equal distribution of stats, which means they will give you exactly the same amount of health, magicka or stamina.
Bottom line, it’s best to look at attributes as “support” stats for your equipment which allow you overcome your armor’s lack of particular stat and compliment your character build to enable more diversity. There is no magic formula for spending attributes so if in doubt mix between health and magicka or health and stamina equally.
Conclusion
Thinking about resources required to cast abilities and the damage scaling is just another thing to pay attention to when creating your character build. You should either try to plan your build beforehand with all class and weapon skill trees and especially armor type, or simply find a recommended build from some other more knowledgeable players if you’re afraid of messing up. In the end the damage increase from base attributes isn’t overly potent, so you probably won’t go wrong either way; you can also always respec both your attribute and skill points, although it is fairly costly.
There’s also overcharging to consider: a system of diminishing returns where placing a majority of attributes in the same stat will start yielding significantly low benefits. Overall a good distribution of attribute points, racial passives and armor types can help you make a better character so take it all into account when planning your build.
Learn more ESO’s mechanics
Get a quick grip on the game with the #1 strategy guide that will blow your mind!
Read the guide »
 Elder Scrolls Online has, according to numerous players and critics, one of the best if not the best crafting systems in any MMORPG. The developers certainly made sure to make crafting meaningful, useful and even fun. With a vast amount of recipes and features like crafting styles there’s always going to be a market for your wares. This is further evident considering the best equipment in game can not only be obtained from dungeons or Cyrodiil, but also crafted by players who dedicate enough time to crafting.
